
Reference
Create a Linux virtual machine in Azure – Learn | Microsoft Docs
RESOURCES USED IN A LINUX VM
- A virtual machine that provides CPU and memory resources
- An Azure Storage account to hold the virtual hard disks
- Virtual disks to hold the OS, applications, and data
- A virtual network (VNet) to connect the VM to other Azure services or your on-premises hardware
- A network interface to communicate with the VNet
- An optional public IP address so you can access the VM
- A resource group
Azure virtual disk sizes are measured in Gibibytes (GiB), which are not the same as Gigabytes (GB); one GiB is approximately 1.074 GB. Therefore, to obtain an approximate equivalent of your virtual disk size in GB, multiply the size in GiB by 1.074, and that will return a size in GB that is relatively close. For example, 32,767 GiB would be approximately 35,183 GB.
By default, two virtual hard disks (VHDs) will be created for your Linux VM:
- The operating system disk: This is your primary drive, and it has a maximum capacity of 2048 GB. It will be labeled as /dev/sda by default.
- A temporary disk: This provides temporary storage for the OS or any apps. On Linux virtual machines, the disk is /dev/sdb and is formatted and mounted to /mnt by the Azure Linux Agent. It is sized based on the VM size and is used to store the swap file.
Advantages of managed Disks
- Increased reliability: Azure ensures that VHDs associated with high-reliability VMs will be placed in different parts of Azure Storage to provide similar levels of resilience.
- Better security: Managed disks are real managed resources in the resource group. This means they can use role-based access control to restrict who can work with the VHD data.
- Snapshot support: Snapshots can be used to create a read-only copy of a VHD. We recommend that you shut down the VM to clear out any processes that are in progress. Creating the snapshot only takes a few seconds. Once it’s done, you can power on the VM and use the snapshot to create a duplicate VM to troubleshoot a production issue or roll back the VM to the point in time that the snapshot was taken.
- Backup support: Managed disks can be automatically backed up to different regions for disaster recovery with Azure Backup without affecting the service of the VM.
WHAT IS A NETWORK SECURITY GROUP?
Virtual networks (VNets) are the foundation of the Azure networking model and provide isolation and protection. Network security groups (NSGs) are the primary tool you use to enforce and control network traffic rules at the networking level. NSGs are an optional security layer that provides a software firewall by filtering inbound and outbound traffic on the VNet.
Security groups can be associated to a network interface (for per host rules), a subnet in the virtual network (to apply to multiple resources), or both levels.

NSGs use rules to allow or deny traffic moving through the network. Each rule identifies the source and destination address (or range), protocol, port (or range), direction (inbound or outbound), a numeric priority, and whether to allow or deny the traffic that matches the rule.
For inbound traffic, Azure processes the security group associated to the subnet and then the security group applied to the network interface. Outbound traffic is handled in the opposite order (the network interface first, followed by the subnet).
Keep in mind that security groups are optional at both levels. If no security group is applied, then all traffic is allowed by Azure. If the VM has a public IP, this could be a serious risk, particularly if the OS doesn’t provide a built-in firewall.
The rules are evaluated in priority order, starting with the lowest priority rule. Deny rules always stop the evaluation. For example, if a network interface rule blocks an outbound request, any rules applied to the subnet will not be checked. For traffic to be allowed through the security group, it must pass through all applied groups.
REFERENCE
Create a Windows virtual machine in Azure – Learn | Microsoft Docs
Reference
Manage virtual machines with the Azure CLI – Learn | Microsoft Docs
Your subscription tier enforces limits on how many resources you can create, as well as the total size of those resources. For example, you are capped to 20 virtual CPUs with the pay-as-you-go subscription, and only 4 vCPUs for a free tier. The Azure CLI will let you know when you exceed this with a Quota Exceeded error. If you hit this error in your own paid subscription, you can request to raise the limits associated with your paid subscription (up to 10,000 vCPUs!) through a free online request.
Resize existing machine
az vm resize \
    --resource-group learn-4e7b9631-49aa-4662-8b98-2ca29c186cb0 \
    --name SampleVM \
    --size Standard_D2s_v3
List vm sizes available for the current machine
az vm list-vm-resize-options \
    --resource-group learn-4e7b9631-49aa-4662-8b98-2ca29c186cb0 \
    --name SampleVM \
    --output table
List Vms in a given location
az vm list-sizes
    --location eastus --output table
List IP address of the VM
az vm list-ip-addresses -n SampleVM -o table
Stopping a VM
We can stop a running VM with the vm stop command. You must pass the name and resource group, or the unique ID for the VM:
az vm stop \
    --name SampleVM \
    --resource-group learn-4e7b9631-49aa-4662-8b98-2ca29c186cb0
We can verify it has stopped by attempting to ping the public IP address, using ssh, or through the vm get-instance-view command. This final approach returns the same basic data as vm show but includes details about the instance itself. Try typing the following command into Azure Cloud Shell to see the current running state of your VM:
az vm get-instance-view \
    --name SampleVM \
    --resource-group learn-4e7b9631-49aa-4662-8b98-2ca29c186cb0 \
    --query "instanceView.statuses[?starts_with(code, 'PowerState/')].displayStatus" -o tsv
This command should return VM stopped as the result.
Reference
Add and size disks in Azure virtual machines – Learn | Microsoft Docs
Types of hard disk
Azure Disks are designed for 99.999% availability i.e 5 9’s. There are four performance tiers for storage that you can choose from when creating your disks — Ultra disks, Premium SSD Disks, Standard SSD, and Standard HDD storage. Depending on the VM size, you can mix and match these disk types.
Ultra disks
Ultra disks include the ability to dynamically change the performance of the disk without the need to restart your virtual machines (VM). Ultra disks are suited for data-intensive workloads such as SAP HANA, top tier databases, and transaction-heavy workloads. Ultra disks can only be used as data disks. We recommend using premium SSDs as OS disks.
Premium SSD disks
Premium SSD disks are backed by solid-state drives (SSDs), and deliver high-performance, low-latency disk support for VMs running I/O-intensive workloads. You can use Premium SSD disks with VM sizes that include an “s” in the series name. For example, there is the Dv3-Series and the Dsv3-series, the Dsv3-series can be used with Premium SSD disks.
Standard SSD
Premium storage is limited to specific VM sizes – so the VM type you create will impact the storage capabilities: size, max capacity, and storage type. What if you have a low-end VM, but you need SSD storage for I/O performance? That’s what Standard SSDs are for. Standard SSDs are between standard HDDs and premium SSDs from a performance and cost perspective.
You can use standard SSDs with any VM size, including VM sizes that don’t support premium storage. Using standard SSDs is the only way to use SSDs with those VMs. This disk type is only available in specific regions and only with managed disks.
Standard HDD
- Standard HDD disks are backed by traditional hard disk drives (HDDs).
- Standard HDD disks are billed at a lower rate than the Premium disks.
- Standard HDD disks can be used with any VM size.
| Attribute | Ultra Disk | Premium SSD | Standard SSD | Standard HDD |
|---|---|---|---|---|
| Disk Type | SSD | SSD | SSD | HDD |
| Max Disk Size | ~65 TB | ~32 TB | ~32 TB | ~32 TB |
| Scenario | IO-intensive workloads such as SAP HANA, top tier databases (for example, SQL, Oracle), and other transaction-heavy workloads. | Production and performance sensitive workloads | Web servers, lightly used enterprise applications and dev/test | Backup, non-critical, infrequent access |
| Max throughput | 2000 Mib/s | 900 Mib/s | 750 Mib/s | 500 Mib/s |
| Max IOPS | 160,000 | 20,000 | 6,000 | 2,000 |
Azure stores your VHD images as page blobs in an Azure Storage account. With managed disks, Azure takes care of managing the storage on your behalf – it’s one of the best reasons to choose managed disks.
You can only resize a disk to a larger size. Shrinking managed disks is not supported.
What is an availability set?
An availability set is a logical feature used to ensure that a group of related VMs are deployed so that they aren’t all subject to a single point of failure and not all upgraded at the same time during a host operating system upgrade in the datacenter. VMs placed in an availability set should perform an identical set of functionalities and have the same software installed.
Microsoft offers a 99.95% external connectivity service level agreement (SLA) for multiple-instance VMs deployed in an availability set. That means that for the SLA to apply, there must be at least two instances of the VM deployed within an availability set.
You can create availability sets through the Azure portal in the disaster recovery section. Also, you can build them using Resource Manager templates, or any of the scripting or API tools. When you place VMs into an availability set, Azure guarantees to spread them across Fault Domains and Update Domains.
What is a fault domain?
A fault domain is a logical group of hardware in Azure that shares a common power source and network switch. You can think of it as a rack within an on-premises datacenter. The first two VMs in an availability set will be provisioned into two different racks so that if the network or the power failed in a rack, only one VM would be affected. Fault domains are also defined for managed disks attached to VMs.

What is an update domain?
An update domain is a logical group of hardware that can undergo maintenance or be rebooted at the same time. Azure will automatically place availability sets into update domains to minimize the impact when the Azure platform introduces host operating system changes. Azure then processes each update domain one at a time.
Availability sets are a powerful feature to ensure the services running in your VMs are always available to your customers. However, they aren’t foolproof. What if something happens to the data or the software running on the VM itself? For that, we’ll need to look at other disaster recovery and backup techniques.
Azure Site Recovery
A fault domain is a logical group of hardware in Azure that shares a common power source and network switch. You can think of it as a rack within an on-premises datacenter. The first two VMs in an availability set will be provisioned into two different racks so that if the network or the power failed in a rack, only one VM would be affected. Fault domains are also defined for managed disks attached to VMs.
Azure Site Recovery replicates workloads from a primary site to a secondary location. If an outage happens at your primary site, you can fail over to a secondary location. This failover allows users to continue to access your applications without interruption. You can then fail back to the primary location once it’s up and running again. Azure Site Recovery is about replication of virtual or physical machines; it keeps your workloads available in an outage.
While there are many attractive technical features to Site Recovery, there are at least two significant business advantages:
Site Recovery enables the use of Azure as a destination for recovery, thus eliminating the cost and complexity of maintaining a secondary physical datacenter.
Site Recovery makes it incredibly simple to test failovers for recovery drills without impacting production environments. This makes it easy to test your planned or unplanned failovers. After all, you don’t have a good disaster recovery plan if you’ve never tried to failover.
The recovery plans you create with Site Recovery can be as simple or as complex as your scenario requires. They can include custom PowerShell scripts, Azure Automation runbooks, or manual intervention steps. You can leverage the recovery plans to replicate workloads to Azure, easily enabling new opportunities for migration, temporary bursts during surge periods, or development and testing of new applications.
Azure Site Recovery works with Azure resources, or Hyper-V, VMware, and physical servers in your on-premises infrastructure and can be a key part of your organization’s business continuity and disaster recovery (BCDR) strategy by orchestrating the replication, failover, and recovery of workloads and applications if the primary location fails.
Azure VM Extensions
Azure VM extensions are small applications that allow you to configure and automate tasks on Azure VMs after initial deployment. Azure VM extensions can be run with the Azure CLI, PowerShell, Azure Resource Manager templates, and the Azure portal.
Azure BackUp
Azure Backup is a backup as a service offering that protects physical or virtual machines no matter where they reside: on-premises or in the cloud.
Azure Backup can be used for a wide range of data backup scenarios, such as the following:
- Files and folders on Windows OS machines (physical or virtual, local or cloud)
- Application-aware snapshots (Volume Shadow Copy Service)
- Popular Microsoft server workloads such as Microsoft SQL Server, Microsoft SharePoint, and Microsoft Exchange
- Native support for Azure Virtual Machines, both Windows, and Linux
- Linux and Windows 10 client machines
Advantages of using Azure Backup
- Automatic storage management. Azure Backup automatically allocates and manages backup storage and uses a pay-as-you-use model. You only pay for what you use.
- Unlimited scaling. Azure Backup uses the power and scalability of Azure to deliver high availability.
- Multiple storage options. Azure Backup offers locally redundant storage where all copies of the data exist within the same region and geo-redundant storage where your data is replicated to a secondary region.
- Unlimited data transfer. Azure Backup does not limit the amount of inbound or outbound data you transfer. Azure Backup also does not charge for the data that is transferred.
- Data encryption. Data encryption allows for secure transmission and storage of your data in Azure.
- Application-consistent backup. An application-consistent backup means that a recovery point has all required data to restore the backup copy. Azure Backup provides application-consistent backups.
- Long-term retention. Azure doesn’t limit the length of time you keep the backup data.
Using Azure Backup
Azure Backup utilizes several components that you download and deploy to each computer you want to back up. The component that you deploy depends on what you want to protect.
- Azure Backup agent
- System Center Data Protection Manager
- Azure Backup Server
- Azure Backup VM extension
Azure Backup uses a Recovery Services vault for storing the backup data. A vault is backed by Azure Storage blobs, making it a very efficient and economical long-term storage medium. With the vault in place, you can select the machines to back up and define a backup policy (when snapshots are taken and for how long they’re stored).
Reference
Secure your Azure virtual machine disks – Learn | Microsoft Docs
Azure disk encryption technologies
The main encryption-based disk protection technologies for Azure VMs are:
- Storage Service Encryption (SSE)
- Azure Disk Encryption (ADE)
Storage Service Encryption is performed on the physical disks in the data center. If someone were to directly access the physical disk the data would be encrypted. When the data is accessed from the disk, it is decrypted and loaded into memory.
Azure Disk Encryption encrypts the virtual machine’s virtual hard disks (VHDs). If VHD is protected with ADE, the disk image will only be accessible by the virtual machine that owns the disk.
It’s possible to use both services to protect your data.
Storage Service Encryption
Azure Storage Service Encryption (SSE) is an encryption service built into Azure used to protect data at rest. The Azure storage platform automatically encrypts data before it’s stored to several storage services, including Azure Managed Disks. Encryption is enabled by default using 256-bit AES encryption, and is managed by the storage account administrator.
Storage Service Encryption is enabled for all new and existing storage accounts and cannot be disabled. Your data is secured by default; you don’t need to modify your code or applications to take advantage of Storage Service Encryption.
Storage Service Encryption does not affect the performance of Azure storage services.
Azure Disk Encryption
Azure Disk Encryption (ADE) is managed by the VM owner. It controls the encryption of Windows and Linux VM-controlled disks, using BitLocker on Windows VMs and DM-Crypt on Linux VMs. BitLocker Drive Encryption is a data protection feature that integrates with the operating system, and addresses the threats of data theft or exposure from lost, stolen, or inappropriately decommissioned computers. Similarly, DM-Crypt encrypts data at rest for Linux before writing to storage.
ADE ensures that all data on VM disks are encrypted at rest in Azure storage, and ADE is required for VMs backed up to the Recovery Vault.
With ADE, VMs boot under customer-controlled keys and policies. ADE is integrated with Azure Key Vault for the management of these disk-encryption keys and secrets.
ADE does not support the encryption of Basic tier VMs, and you cannot use an on-premises Key Management Service (KMS) with ADE.

As you can see in the diagram, ADE is performed at VM OS level whereas SSE is performed at the storage level. All Managed disks of Azure VM are backed by Azure page blobs and this is where SSE is performed. As ADE is performed at OS level, we use tools such as BitLocker and DMCrypt.
Microsoft stores the disk images in their own managed storage accounts behind the scenes, encrypted using AES-256 and a Microsoft managed key. You can’t use a customer managed key to encrypt the Microsoft managed storage accounts used to store managed disk images.
The Microsoft default encryption provides some protection in that if, for example, the physical disks were stolen from a Microsoft data center, then it wouldn’t be possible to decrypt the contents or recreate a virtual machine from the image without the Microsoft managed key. However, this doesn’t provide any protection against the (unlikely) possibility of an image being copied from the Microsoft managed storage location while it’s powered on in the data center, as the encryption key will be held in memory at that point in time.
Azure Disk Encryption, using a customer managed key stored in Azure Key Vault, provides an additional layer of protection by encrypting at the virtual machine disk level, as well as at the underlying storage level. In this case, if the encrypted disk image was copied from the Microsoft managed storage location, it couldn’t be decrypted or the virtual machine started, unless the attacker also had access to the customer managed key in Azure Key Vault.
Azure Disk Encryption prerequisites
Before you can encrypt your VM disks, you need to:
- Create a key vault.
- Set the key vault access policy to support disk encryption.
- Use the key vault to store the encryption keys for ADE.
Azure Key Vault
The encryption keys used by ADE can be stored in Azure Key Vault. Azure Key Vault is a tool for securely storing and accessing secrets. Azure Disk Encryption requires that your key vault and your VMs are in the same Azure region; this ensures that encryption secrets do not cross regional boundaries.
Access policies in the key vault
Azure needs access to the encryption keys or secrets in your key vault to make them available to the VM for booting and decrypting the volumes. We covered this for the portal when we changed the Advanced access policies above.
There are three policies you can enable.
- Disk encryption – Required for Azure Disk encryption.
- Deployment – (Optional) Enables the Microsoft.Compute resource provider to retrieve secrets from this key vault when this key vault is referenced in resource creation, for example when creating a virtual machine.
- Template deployment – (Optional) Enables Azure Resource Manager to get secrets from this key vault when this key vault is referenced in a template deployment.
Reference
Keep your virtual machines updated – Learn | Microsoft Docs
Azure Automation
Azure Automation delivers a cloud-based automation and configuration service that supports consistent management across your Azure and non-Azure environments. It comprises process automation, configuration management, update management, shared capabilities, and heterogeneous features. Automation gives you complete control during deployment, operations, and decommissioning of workloads and resources.

Components Used by Update Management – A component of Azure Automation
The following configurations are used to perform assessment and update deployments:
- Microsoft Monitoring Agent (MMA) for Windows or Linux.
- PowerShell Desired State Configuration (DSC) for Linux.
- Automation Hybrid Runbook Worker.
- Microsoft Update or Windows Server Update Services (WSUS) for Windows computers.
Compliance scan
Update Management will perform a scan for update compliance. A compliance scan is by default, performed every 12 hours on a Windows computer and every 3 hours on a Linux computer. In addition to the scan schedule, a compliance scan is initiated within 15 minutes if the MMA is restarted, before update installation, and after update installation. After a computer performs a scan for update compliance, the agent forwards the information in bulk to Azure Log Analytics.
It can take between 30 minutes and 6 hours for the dashboard to display updated data from managed computers.
Recurring Updates
You can create a scheduled and recurring deployment of updates. With scheduled deployment you can define what target computers receive the updates, either by explicitly specifying computers or by selecting a computer group that’s based on log searches of a specific set of computers. You also specify a schedule to approve and designate a period of time during which updates can be installed. Updates are installed by runbooks in Azure Automation. You can’t view these runbooks, and the runbooks don’t require any configuration. When an update deployment is created, the update deployment creates a schedule that starts a master update runbook at the specified time for the included computers. The master runbook starts a child runbook on each agent to perform installation of required updates.
Hybrid Runbook Worker overview
Runbooks in Azure Automation might not have access to resources in other clouds or in your on-premises environment because they run on the Azure cloud platform. You can use the Hybrid Runbook Worker feature of Azure Automation to run runbooks directly on the machine that’s hosting the role and against resources in the environment to manage those local resources. Runbooks are stored and managed in Azure Automation and then delivered to one or more assigned machines.

A Hybrid Runbook Worker can run on either the Windows or the Linux operating system. It depends on the Log Analytics agent reporting to an Azure Monitor Log Analytics workspace. The workspace is not only to monitor the machine for the supported operating system, but also to download the components required for the Hybrid Runbook Worker.
Each Hybrid Runbook Worker is a member of a Hybrid Runbook Worker group that you specify when you install the agent. A group can include a single agent, but you can install multiple agents in a group for high availability. Each machine can host one hybrid worker reporting to one Automation account.
When you start a runbook on a Hybrid Runbook Worker, you specify the group that it runs on. Each worker in the group polls Azure Automation to see if any jobs are available. If a job is available, the first worker to get the job takes it. The processing time of the jobs queue depends on the hybrid worker hardware profile and load. You can’t specify a particular worker.
Reference
Build Azure Resource Manager templates – Learn | Microsoft Docs
Azure Resource Manager
Azure Resource Manager is the interface for managing and organizing cloud resources. Think of Resource Manager as a way to deploy cloud resources. If you’re familiar with Azure resource groups, you know that they enable you to treat sets of related resources as a single unit. Resource Manager is what organizes the resource groups that let you deploy, manage, and delete all of the resources together in a single action.
Resource Manager templates
A Resource Manager template precisely defines all the Resource Manager resources in a deployment. You can deploy a Resource Manager template into a resource group as a single operation. A Resource Manager template is a JSON file, making it a form of declarative automation. Declarative automation means that you define what resources you need but not how to create them. Put another way, you define what you need and it is Resource Manager’s responsibility to ensure that resources are deployed correctly.
Components of resource manager template
- Parameters
- Variables
- Functions
- Resources
- Outputs
# Provide values for parameters
RESOURCEGROUP=learn-quickstart-vm-rg
LOCATION=eastus
az group create --name $RESOURCEGROUP --location $LOCATION
USERNAME=azureuser
PASSWORD=$(openssl rand -base64 32)
DNS_LABEL_PREFIX=mydeployment-$RANDOM

# Validate the deployment
az deployment group validate \
  --resource-group $RESOURCEGROUP \
  --template-uri "https://raw.githubusercontent.com/Azure/azure-quickstart-templates/master/101-vm-simple-linux/azuredeploy.json" \
  --parameters adminUsername=$USERNAME \
  --parameters authenticationType=password \
  --parameters adminPasswordOrKey=$PASSWORD \
  --parameters dnsLabelPrefix=$DNS_LABEL_PREFIX

# Deploy using Azure template
az deployment group create \
  --name MyDeployment \
  --resource-group $RESOURCEGROUP \
  --template-uri "https://raw.githubusercontent.com/Azure/azure-quickstart-templates/master/101-vm-simple-linux/azuredeploy.json" \
  --parameters adminUsername=$USERNAME \
  --parameters authenticationType=password \
  --parameters adminPasswordOrKey=$PASSWORD \
  --parameters dnsLabelPrefix=$DNS_LABEL_PREFIX

# Verify the deployment
az deployment group show \
  --name MyDeployment \
  --resource-group $RESOURCEGROUP

# List the VM
az vm list \
  --resource-group $RESOURCEGROUP \
  --output table
Custom Script Extension
Custom Script Extension is an easy way to download and run scripts on your Azure VMs. It’s just one of the many ways you can configure a VM once it’s up and running.
Install and configure web server software on your VM using a custom script extension
az vm extension set \
  --resource-group $RESOURCEGROUP \
  --vm-name simpleLinuxVM \
  --name customScript \
  --publisher Microsoft.Azure.Extensions \
  --version 2.0 \
  --settings '{"fileUris":["https://raw.githubusercontent.com/MicrosoftDocs/mslearn-welcome-to-azure/master/configure-nginx.sh"]}' \
  --protected-settings '{"commandToExecute": "./configure-nginx.sh"}'
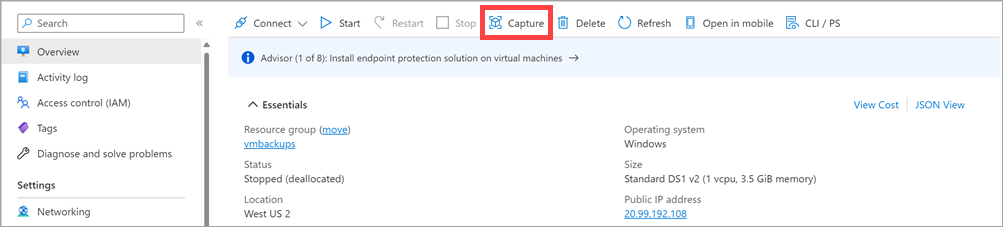
Deploy Azure virtual machines from VHD templates
Deploy Azure virtual machines from VHD templates – Learn | Microsoft Docs
You can also build your own virtual machine images and VHDs from scratch by using Microsoft Hyper-V. You can then upload these images to Azure so that your virtual machines can use them.
Generalized Image
You can create your own custom virtual machine image in one of two ways:
- If you’re building an image from scratch by using Hyper-V, you first create a blank virtual disk, and then create a virtual machine with this disk. When you start the virtual machine, you install the operating system and any other additional software from source disks (typically DVDs) and other packages.
- If you’re customizing an image from Azure Marketplace, you build a virtual machine by using an existing image. The image provides the operating system and base functionality. You add your own software, operating system updates, and other packages as required. Unit 3 describes this process in more detail.

After you build and customize a virtual machine, you can save the new image as a set of VHDs. However, you must do some cleaning up first. This is because as you create a virtual machine, the operating system data is updated with several items, including:
- The host name of your virtual machine.
- The username and credentials that you provided when you installed the operating system on the virtual machine.
- Log files.
- Security identifiers for various operating system services.
You must reset these items back to a default state before you use the image to create more virtual machines. Otherwise, you might end up with multiple virtual machines that have the same identities. The process of resetting this data is called generalization, and the result is a generalized image. The tools for preparing a virtual machine for generalization vary according to the operating system that’s being installed and configured. For Windows, use the Microsoft System Preparation (Sysprep) tool. For Linux, use the Windows Azure Linux Agent (waagent) tool.
Specialized Virtual Image
A specialized virtual image is a copy of a live virtual machine after it has reached a specific state. For example, a specialized image might contain a copy of the configured operating system, software, user accounts, databases, connection information, and other data for your system. You can use a specialized virtual image as a backup of your system at a particular point in time. If you need to recover after a catastrophic failure, or you need to roll back the virtual machine, you can restore your virtual machine from this image. If you use a specialized image to create a new virtual machine, the new virtual machine will retain all of the data from the image. That data includes the host name, user accounts, and other settings.
Generalize a Windows virtual machine
If you’re building a Windows image, you use the Sysprep (located in \windows\system32\sysprep.exe) tool to prepare a virtual machine for generalization. Sysprep removes server-specific information from the image, such as the host name, user sign-in information, and logs. Sysprep also removes any machine-specific identifiers that Windows uses internally.
Running Sysprep is a destructive process, and you can’t easily reverse its effects. Back up your virtual machine first.

After the virtual machine has been shut down, you must deallocate it while it’s in this clean state. If you’re using PowerShell, run the following command:
# Windows
# Shutdown the machine
# Powershell
Stop-AzVM -ResourceGroupName <resource group> `
    -Name <virtual machine name> `
    -Force
# Azure CLI
az vm deallocate \
    --resource-group <resource group> \
    --name <virtual machine name>

# Then Generalize
# Powershell
Set-AzVM -ResourceGroupName <resource group> `
    -Name <virtual machine name> `
    -Generalize

# Azure CLI
az vm generalize \
    --name <virtual machine name>
Generalize a Linux Virtual Machine
If you’re building a Linux image, you use the waagent tool to prepare a virtual machine for generalization. The waagent tool performs tasks like deleting the most recently created user account, removing public SSH keys, resetting the host name and other machine-specific details, and cleaning log files.
waagent -deprovision+user
# Then stop and deallocate the VM as before
Create an image from a generalized VM
When you create a virtual machine image in this way, the original virtual machine becomes unusable. You can’t restart it. Instead, you must create a new virtual machine from the image, as described later in this unit.
# Powershell
$vm = Get-AzVM -ResourceGroupName <resource group> `
    -Name <generalized virtual machine>

# Get the image configuration
$image = New-AzImageConfig -SourceVirtualMachineId `
    $vm.ID -Location<virtual machine location>

# Create the image
New-AzImage -Image $image `
    -ImageName <image name> `
    -ResourceGroupName <resource group>

# Azure CLI
az image create \
    --name <image name> \
    --resource-group <resource group> \
    --source <generalized virtual machine>

# Now create VM from Generalized Image
# Powershell
New-AzVm `
    -ResourceGroupName <resource group> `
    -Name <new virtual machine name> `
    -ImageName <image name> `
    -Location <location of image> `

# Azure CLI
az vm create \
    --resource-group <resource group> \
    --name <new virtual machine name> \
    --image <image name> \
    --location <location of image>
Create a snapshot of a VHD
A virtual machine image contains an image of every VHD in the virtual machine. You can also create separate snapshot images of a VHD at any time. A snapshot is a read-only copy of a VHD. You can use a snapshot to restore a VHD to the state it was in when the snapshot was taken. If you’re taking an image of a virtual machine that spans several VHDs, you must ensure that all disk activity has stopped, and that you take a snapshot of every VHD. Failure to do this can result in inconsistencies if you need to restore the virtual machine from these snapshots. By stopping the virtual machine, you can ensure that there is no disk activity and that a successful snapshot is taken. Unlike creating an image of a virtual machine, capturing a snapshot of a VHD is a non-destructive process. You can continue running virtual machines by using the VHD afterward.
Rebuilding a virtual machine from a set of VHD snapshots is a two-step process:
- For each snapshot, create a new managed disk. Specify the snapshot as the source of the managed disk.
- Create the new virtual machine by using the managed disk. You can do this through PowerShell, the Azure CLI, or the portal.
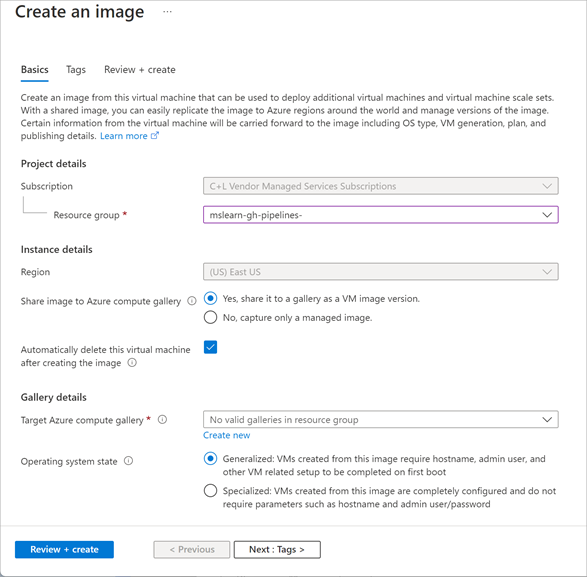
A managed image resource can be created from a generalized virtual machine (VM) that is stored as either a managed disk or an unmanaged disk in a storage account. The image can then be used to create multiple VMs. One managed image supports up to 20 simultaneous deployments. Attempting to create more than 20 VMs concurrently, from the same managed image, may result in provisioning timeouts due to the storage performance limitations of a single VHD. To create more than 20 VMs concurrently, use a Shared Image Galleries image configured with 1 replica for every 20 concurrent VM deployments.
Optional: Use DISM to optimize your image and reduce your VM’s first boot time. To optimize your image, mount your VHD by double-clicking on it in Windows explorer, and then run DISM with the /optimize-image parameter.Running DISM /optimize-image should be the last modification you make to your VHD. If you make any changes to your VHD prior to deployment, you’ll have to run DISM /optimize-image again.
You can create VMs from an image in any resource group within your subscription. To create a VM in a different resource group than the image, specify the full resource ID to your image. Use az image list to view a list of images.
Shared Image Gallery is a service that helps you build structure and organization around your images. Shared Image Galleries provide:
- Global replication of images.
- Versioning and grouping of images for easier management.
- Highly available images with Zone Redundant Storage (ZRS) accounts in regions that support Availability Zones. ZRS offers better resilience against zonal failures.
- Premium storage support (Premium_LRS).
- Sharing across subscriptions, and even between Active Directory (AD) tenants, using RBAC.
- Scaling your deployments with image replicas in each region.
- Using a Shared Image Gallery you can share your images to different users, service principals, or AD groups within your organization. Shared images can be replicated to multiple regions, for quicker scaling of your deployments.
Reference
Build a scalable application with virtual machine scale sets – Learn | Microsoft Docs
What is a virtual machine scale set?
Virtual machine scale sets in Azure are designed to allow you to deploy and manage many load-balanced, identical VMs. These machines run with the same configurations. Virtual machine scale sets are intelligent enough to automatically scale up or down the number of VM instances. A scale set can also change the size of VM instances. The criteria used to activate the upscale or downscale can depend on a customized schedule or actual demand and usage. Scale sets apply the same configuration to a group of VMs simultaneously. They don’t require you to manually configure instances individually. A scale set uses a load balancer to distribute requests across the VM instances. It uses a health probe to determine the availability of each instance. The health probe pings the instance. If the instance responds, the scale set knows the instance is still available. If the ping fails or times out, the scale set knows the instance is unavailable and doesn’t send requests to it. Virtual machine scale sets support both Linux and Windows VMs in Azure. However, keep in mind that you’re limited to running 1,000 VMs on a single scale set.
Scaling options for scale sets
Scale sets are designed for cost-effectiveness. New VM instances are created only when needed. A scale set can scale VMs either horizontally or vertically.
- Horizontal scaling is the process of adding or removing several VMs in a scale set.
- Vertical scaling is the process of adding resources such as memory, CPU power, or disk space to VMs.In contrast to horizontal scaling, where new, identically sized VMs are added to or removed from a scale set, vertical scaling focuses on increasing the size of the VMs in the scale set.Vertical scaling typically requires rebooting the affected VMs in the scale set. This process can lead to temporary degraded performance across the scale set while the VMs restart.
Scaling a scale set
- Scheduled scaling: You can proactively schedule the scale set to deploy one or N number of additional instances to accommodate a spike in traffic and then scale back down when the spike ends.
- Autoscaling: If the workload is variable and can’t always be scheduled, you can use metric-based threshold scaling. Autoscaling horizontally scales out based on node usage. It then scales back in when the resources return to a baseline.
Low-priority scale sets
A low-priority virtual machine scale set allows you to use Azure compute resources at cost savings of up to 80 percent. The global Azure infrastructure frequently has underused compute resources available. A low-priority scale set provisions VMs through this underused compute capability.When you use these VMs, keep in mind that they’re temporary. Availability depends on size, region, time of day, and so on. These VMs have no SLA.
In a low-priority scale set, you specify two kinds of removal:
- Delete: The entire VM is removed, including all of the underlying disks.
- Deallocate: The VM is stopped. The processing and memory resources are deallocated. Disks are left intact and data is kept. You’re charged for the disk space while the VM isn’t running.
Low-priority scale sets are useful for workloads that run with interruptions or when you need larger VMs at a much-reduced cost. Just keep in mind that you can’t control when a VM might be removed.
# Azure CLI
# Resource Group
az group create \
  --location westus \
  --name scalesetrg

# Create Scale Set
az vmss create \
  --resource-group scalesetrg \
  --name webServerScaleSet \
  --image UbuntuLTS \
  --upgrade-policy-mode automatic \
  --custom-data cloud-init.yaml \
  --admin-username azureuser \
  --generate-ssh-keys

# By default, the new virtual machine scale set has two instances and a load balancer.
# The custom-data flag specifies that the VM configuration should use the settings in the cloud-init.yaml file after the VM has been created. You can use a cloud-init file to install additional packages, configure security, and write to files when the machine is first installed.

# Add a health probe to the load balancer.The health probe pings the root of the website through port 80. If the website doesn't respond, the server is considered unavailable. The load balancer won't route traffic to the server.

az network lb probe create \
  --lb-name webServerScaleSetLB \
  --resource-group scalesetrg \
  --name webServerHealth \
  --port 80 \
  --protocol Http \
  --path /

# Configure the load balancer to route HTTP traffic to the instances in the scale set:
az network lb rule create \
  --resource-group scalesetrg \
  --name webServerLoadBalancerRuleWeb \
  --lb-name webServerScaleSetLB \
  --probe-name webServerHealth \
  --backend-pool-name webServerScaleSetLBBEPool \
  --backend-port 80 \
  --frontend-ip-name loadBalancerFrontEnd \
  --frontend-port 80 \
  --protocol tcp

# Verify that 2 VM instances are running and that their size is DS1_V2

# To manually increase or decrease the number of instances in a SS
az vmss scale \
    --name MyVMScaleSet \
    --resource-group MyResourceGroup \
    --new-capacity 6
If you need to handle a steady expansion of work over time, the best approach is to scale horizontally. But if the workload increases in complexity rather than in volume, and this complexity demands more of your resources, you might prefer to scale vertically.
Autoscale virtual machine scale sets
You can base the autoscale on:
- Schedule: Use this approach if you know you’ll have an increased workload on a specified date or time period.
- Metrics: Adjust scaling by monitoring performance metrics associated with the scale set. When these metrics exceed a specified threshold, the scale set can automatically start new virtual machine instances. When the metrics indicate that the additional resources are no longer required, the scale set can stop any excess instances.
Autoscale conditions, rules, and limits
Autoscaling is based on a set of scale conditions, rules, and limits. A scale condition combines time and a set of scale rules. If the current time falls within the period defined in the scale condition, the condition’s scale rules are evaluated. The results of this evaluation determine whether to add or remove instances in the scale set. The scale condition also defines the limits of scaling for the maximum and minimum number of instances.
A metrics-based scale rule specifies the resources to monitor, such as CPU usage or response time. This scale rule adds or removes instances from the scale set according to the values of these metrics. You specify limits on the number of instances to prevent a scale set from excessively scaling in or out.
These metrics are commonly used to monitor a virtual machine scale set:
- Percentage CPU: This metric indicates the CPU usage across all instances. A high value shows that instances are becoming CPU-bound, which could delay the processing of client requests.
- Inbound flows and outbound flows: These metrics show how fast network traffic is flowing into and out of virtual machines in the scale set.
- Disks read operations/sec and disk write operations/sec: These metrics show the volume of disk I/O across the scale set.
- Data disk queue depth: This metric shows how many I/O requests to only the data disks on the virtual machines are waiting to be serviced.
A scale rule aggregates the values retrieved for a metric for all instances. It aggregates the values across a period known as the time grain. Each metric has an intrinsic time grain, but usually this period is one minute. The aggregated value is known as the time aggregation. The time-aggregation options are average, minimum, maximum, total, last, and count. A one-minute interval is too short to determine whether any change in the metric is long-lasting enough to make autoscaling worthwhile. A scale rule takes a second step, further aggregating the time aggregation’s value over a longer, user-specified period. This period is called the duration. The minimum duration is five minutes. For example, if the duration is set to 10 minutes, the scale rule aggregates the 10 values calculated for the time grain. The duration’s aggregation calculation can differ from the time grain’s aggregation calculation. For example, let’s say the time aggregation is average and the statistic gathered is percentage CPU across a one-minute time grain. So for every minute, the average CPU percentage usage across all instances during that minute will be calculated. If the time-grain statistic is set to maximum and the rule’s duration is set to 10 minutes, the maximum of the 10 average values for the CPU usage percentage determines whether the rule threshold has been crossed. When a scale rule detects that a metric has crossed a threshold, it can do a scale action. A scale action can be a scale-out or a scale-in. A scale-out action increases the number of instances. A scale-in action reduces the instance count. A scale action uses an operator such as less than, greater than, or equal to to determine how to react to the threshold. Scale-out actions typically use the greater than operator to compare the metric value to the threshold. Scale-in actions tend to compare the metric value to the threshold by using the less than operator. A scale action also sets the instance count to a specific level rather than increasing or decreasing the number available. A scale action has a cool down period, specified in minutes. During this period, the scale rule isn’t triggered again. The cool-down allows the system to stabilize between scale events. Starting or shutting down instances takes time, so any metrics gathered might not show significant changes for several minutes. The minimum cool-down period is five minutes. Finally, plan for a scale-in when a workload decreases. Consider defining scale rules in pairs in the same scale condition. One scale rule should indicate how to scale the system out when a metric exceeds an upper threshold. The other rule needs to define how to scale the system back in again when the same metric drops below a lower threshold. Don’t make both threshold values the same. Otherwise you could trigger a series of oscillating events that scale out and back in again.
Azure custom script extension?
An Azure custom script extension downloads and runs a script on an Azure VM. It can automate the same tasks on all the VMs in a scale set.Store your custom scripts in Azure Storage or in GitHub. To add one to a VM, you can use the Azure portal. To run custom scripts as part of a templated deployment, combine a custom script extension with Azure Resource Manager templates.
# To use a custom script extension with the Azure CLI, you create a configuration file that defines the files to get and the commands to run. This file is in JSON format.
# yourConfigV1.json
{
  "fileUris": ["https://raw.githubusercontent.com/yourrepo/master/custom_application_v1.sh"],
  "commandToExecute": "./custom_application_v1.sh"
}
# To deploy this configuration on the scale set, you use a custom script extension.
az vmss extension set \
  --publisher Microsoft.Azure.Extensions \
  --version 2.0 \
  --name CustomScript \
  --resource-group myResourceGroup \
  --vmss-name yourScaleSet \
  --settings @yourConfigV1.json

# The VMs are updated according to the upgrade policy for the scale set. You specify this policy when you first create the scale set.
az vmss create \
  --resource-group MyResourceGroup \
  --name MyScaleSet \
  --image UbuntuLTS \
  --upgrade-policy-mode automatic \
  --admin-username azureuser \
  --generate-ssh-keys

 # View the current upgrade policy for the scale set
az vmss show \
    --name webServerScaleSet \
    --resource-group scalesetrg \
    --query upgradePolicy.mode
The upgrade policy can have one of the following three modes:
- Automatic: The scale set doesn’t define when the VMs are upgraded. They could all update at the same time, causing a service outage.
- Rolling: The scale set rolls out the update in batches across the VMs in the scale set. An optional pause can minimize or eliminate a service outage. In this mode, machines in the scale set might run different versions of the app for a short time. This mode requires that you either add a health probe to the scale set or apply the application health extension to the scale set.
- Manual: Existing VMs in the scale set aren’t updated. All changes must be done manually. This mode is the default.
Application Health extension
The Application Health extension is deployed inside a virtual machine scale set instance and reports on VM health from inside the scale set instance. You can configure the extension to probe on an application endpoint and update the status of the application on that instance. This instance status is checked by Azure to determine whether an instance is eligible for upgrade operations. As the extension reports health from within a VM, the extension can be used in situations where external probes such as Application Health Probes (that utilize custom Azure Load Balancer probes) can’t be used.
Reference
When you deploy a set of virtual machines (VMs) to host a production system, it’s essential that all the VMs have the same state. They must have the same services installed. VMs should be configured in the same way, and the software on each machine must be the same version. The configuration of each VM can drift. You can end up with systems that are prone to failure because of incompatibilities in the setup of each machine. Azure Automation State Configuration addresses many of the problems associated with deploying at scale and managing configuration drift.
Azure Automation State Configuration
You use Azure Automation State Configuration to make sure that the virtual machines (VMs) in a cluster are in a consistent state. The VMs should have the same software installed and the same configurations.Azure Automation State Configuration is an Azure service built on PowerShell. It allows you to consistently deploy, reliably monitor, and automatically update the desired state of all your resources. Azure Automation provides tools to define configurations and apply them to real and virtual machines.Azure Automation State Configuration uses PowerShell DSC to help address these challenges. It centrally manages your DSC artifacts and the DSC process. Azure Automation State Configuration has a built-in pull server. You can target nodes to automatically receive configurations from this pull server, conform to the desired state, and report back on their compliance. Target virtual or physical Windows or Linux machines, in the cloud or on-premises.You can use Azure Monitor logs to review the compliance of your nodes by configuring Azure Automation State Configuration to send this data.
What is PowerShell DSC?
PowerShell DSC is a declarative management platform that Azure Automation State Configuration uses to configure, deploy, and control systems. A declarative programming language separates intent (what you want to do) from execution (how do you want to do it). You specify the desired state and let DSC do the work to get there. You don’t have to know how to implement or deploy a feature when a DSC resource is available. Instead, you focus on the structure of your deployment.
DSC assures Idempotence. Idempotence describes an operation that has the same effect whether you run it once or 10,001 times. To achieve idempotence in PowerShell, you need to add logic and error handling. If the share doesn’t exist, you create it. If the share does exist, there’s no need to create it.
What is the LCM?
The local configuration manager (LCM) is a component of the Windows Management Framework (WMF) that’s on a Windows operating system. The LCM is responsible for updating the state of a node, like a VM, to match the desired state. Every time the LCM runs, it completes the following steps:
- Get: Get the current state of the node.
- Test: Compare the current state of a node against the desired state by using a compiled DSC script (.mof file).
- Set: Update the node to match the desired state described in the .mof file.
- You configure the LCM when you register a VM with Azure Automation.
Push and pull architectures in DSC
The LCM on each node can operate in two modes. Push mode: An administrator manually sends, or pushes, the configurations toward one or more nodes. The LCM makes sure that the state on each node matches what the configuration specifies.
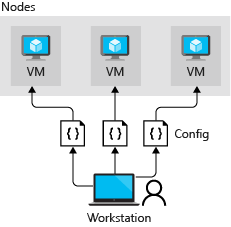
Pull mode: A pull server holds the configuration information. The LCM on each node polls the pull server at regular intervals, by default every 15 minutes, to get the latest configuration details. These requests are denoted as step 1 in the following diagram. In step 2, the pull server sends the details about any configuration changes back to each node.

In pull mode, each node has to be registered with the pull service. Both modes have advantages:
- Push mode is easy to set up. It doesn’t need its own dedicated infrastructure, and it can run on a laptop. Push mode is helpful to test the functionality of DSC. You could also use push mode to get a newly imaged machine to the baseline desired state.
- Pull mode is useful in an enterprise deployment that spans a large number of machines. The LCM regularly polls the pull server and makes sure the nodes are in the desired state. If an external tool or team applies hotfixes that result in configuration drift on individual machines, those machines are quickly brought back in line with the configuration you’ve set. This process can help you achieve a state of continuous compliance for your security and regulatory obligations.
The first time the Azure DSC extension is called, it installs an OS-compatible version of WMF on all Windows versions except Windows Server 2016 and later. Windows Server 2016 and later versions already have the latest version of WMF installed. After WMF is installed, the machine requires a restart.
DSC code block
Configuration MyDscConfiguration {              ##1 - Configuration
    Node "localhost" {                          ##2 - Node
        WindowsFeature MyFeatureInstance {      ##3 - Resource
            Ensure = 'Present'
            Name = 'Web-Server'
        }
    }
}
MyDscConfiguration -OutputPath C:\temp\         ##4 - MyDscConfiguration Block
Secure credentials in a DSC script
A DSC script might require credential information for the configuration process. Avoid putting a credential in plaintext in your source code management tool. Instead, DSC configurations in Azure Automation can reference credentials stored in a PSCredential object.Credentials aren’t encrypted in .mof files by default. They’re exposed as plaintext. To encrypt credentials, use a certificate in your configuration data. The certificate’s private key needs to be on the node on which you want to apply the configuration. Certificates are configured through the node’s LCM.After you create a compiled .mof file for a configuration, you can push it to a node by running the Start-DscConfiguration cmdlet.
Pull the configuration for nodes


Reference
Deploy and run a containerized web app with Azure App Service – Learn | Microsoft Docs
Security is an important reason to choose Container Registry instead of Docker Hub:
- You have much more control over who can see and use your images.
- You can sign images to increase trust and reduce the chances of an image becoming accidentally (or intentionally) corrupted or otherwise infected.
- All images stored in a container registry are encrypted at rest.
Reference
https://docs.microsoft.com/en-us/learn/modules/app-service-scale-up-scale-out/
App Service Plans
| Tier | Space / Compute / Other | # of apps | Instances | SLA |
|---|---|---|---|---|
| Free | 1 GB | 10 | 1 shared Instance | No |
| Shared | 240 mins compute | 100 | 1 shared Instance | No |
| Basic | 3 Levels with varying amounts of compute, memory & storage | unlimited | 3 dedicated instances | 99.95% |
| Standard | 3 levels with varying amounts of compute, power & storage | unlimited | 10 dedicated instances | 99.95% |
| Premium | Multiple levels of hardware | Unlimited | 20 dedicated instances | 99.95% |
| Isolated | Multiple levels of hardware | Unlimited | 100 dedicated instances | 99.95% |
Monitor and scale a web app
When you create a web app, you can either create a new App Service plan or use an existing one. If you select an existing plan, any other web apps that use the same plan will share resources with your web app. They’ll all scale together, so they need to have the same scaling requirements. If your apps have different requirements, use a separate App Service plan for each one.
You scale out by adding more instances to an App Service plan, up to the limit available for your selected tier. If you’re not using the Free tier, you’re charged for each instance by the hour. You can perform this task in the Azure portal.
Reference
Run Docker containers with Azure Container Instances – Learn | Microsoft Docs
- Always: Containers in the container group are always restarted. This policy makes sense for long-running tasks such as a web server. This is the default setting applied when no restart policy is specified at container creation.
- Never: Containers in the container group are never restarted. The containers run one time only.
- OnFailure: Containers in the container group are restarted only when the process executed in the container fails (when it terminates with a nonzero exit code). The containers are run at least once. This policy works well for containers that run short-lived tasks.
Reference
Introduction to Azure Kubernetes Service – Learn | Microsoft Docs
The standard container management runtime is focused on managing individual containers. However, there are times where you’ll want to scale and have multiple containers working together. Scaling multiple containers becomes challenging as several factors need consideration when managing multiple containers. Suppose you need to handle load balancing, security, network connectivity, and deployment. To help make this process easier, it’s common to use a container management platform such as Kubernetes.
What is Kubernetes?
Kubernetes is a portable, extensible open-source platform for automating deployment, scaling, and the management of containerized workloads. Kubernetes abstracts away complex container management and provides us with declarative configuration to orchestrate containers in different compute environments.Azure Kubernetes Service (AKS) manages your hosted Kubernetes environment and makes it simple to deploy and manage containerized applications in Azure. Your AKS environment is enabled with features such as automated updates, self-healing, and easy scaling. The Kubernetes cluster master is managed by Azure and is free. You manage the agent nodes in the cluster and only pay for the VMs on which your nodes run.
AKS cluster

Azure Dev Spaces
Azure Dev Spaces helps your development teams be more productive on Kubernetes and allows you to:
- Minimize the local dev machine setup for each team member as developers can work directly in AKS
- Rapidly iterate and debug code directly in Kubernetes using Visual Studio or Visual Studio Code
- Generate Docker and Kubernetes configuration-as-code assets to use from development through to production
- Develop your code in isolation, and do integrated testing with other components without replicating or mocking up dependencies
- True or false: for security reasons, you must use an image from the official Azure Marketplace when creating a new virtual machine.
- True
- False
- What is the effect of the default network security settings for a new virtual machine?
- Neither outbound nor inbound requests are allowed.
- Outbound request are allowed. Inbound traffic is only allowed from within the virtual network.
- There are no restrictions: all outbound and inbound requests are allowed.
- Suppose you have several Linux virtual machines hosted in Azure. You will administer these VMs remotely over SSH from three dedicated machines in your corporate headquarters. Which of the following authentication methods would typically be considered best-practice for this situation?
- Username and password
- Private key
- Private key with passphrase
- When creating a Windows virtual machine in Azure, which port would you open using the INBOUND PORT RULES in order to allow remote-desktop access?
- HTTPS
- SSH (22)
- RDP (3389)
- Suppose you have an application running on a Windows virtual machine in Azure. What is the best-practice guidance on where the app should store data files?
- The OS disk (C:)
- The Temporary disk (D:)
- An attached data disk
- What is the final rule that is applied in every Network Security Group?
- Allow All
- Deny All
- You configure the final rule to your needs
- Suppose you’re an administrator of several Azure virtual machines. You get a text message indicating some problems with your VMs. You are at a friend’s house and only have your tablet with you. True or false: you’ll still be able to access the Azure CLI using the tablet, even though you can’t install the CLI on it.
- True
- False
- Suppose you have a script that creates several VMs with different images. When the script issues the command to create the first VM you do not want to block the script while the VM is created, instead you want the script to immediately move on to the next command. What is the best way to do this?
- Add the ‘–async’ argument to your create command.
- Use the ampersand (&) to run the process in the background.
- Most Azure commands return JSON by default. Sometimes this data set can be very large which makes it difficult to read and tricky to use the result of one command as input to another command. What can you use with Azure CLI to filter the results to get only the data that you need?
- You can use the ‘–query’ argument.
- You can use the ‘–filter’ argument.
- You can pipe the results to a JSON parsing utility and use filtering capability there.
- When you enable Azure Disk Encryption (ADE) on a Windows virtual machine (VM), what does it use to encrypt the data on your virtual hard disks?
- DM-Crypt
- BitLocker
- Azure Key Vault
- To use Azure Key Vault with ADE, what policy do you need to set?
- Configure an access policy to permit at least one security principal.
- Create an access policy to allow template deployment.
- Set the key vault access policy to support disk encryption.
- Suppose you create a new VM with a single OS disk and a single data disk. You use the default options when you create the VM. You don’t have an Azure Key Vault set up in your subscription. Which option most accurately describes the encryption state of those disks?
- Both disks are unencrypted.
- The OS disk is encrypted using Storage Service Encryption (SSE). The data disk is unencrypted.
- Both disks are encrypted using Storage Service Encryption.
- Declarative automation means that:
- You define both what resources you need as well as the steps needed to create them.
- You define what resources you need but not how to create them.
- You define what resources you need, and the system ensures that those resources are always available.
- How can you help Resource Manager determine the correct order to apply resources?
- Use the dependsOn element to define when one resource must exist before another can be deployed.
- In your template, define resources in the order they need to be deployed.
- Set the order property on each resource.
- Say you want to create a reusable template that uses the Custom Script Extension to configure web content on a VM. What’s the best way to enable deployments to specify the script that configures web content?
- Provide a parameter that specifies the script location.
- Provide a variable that specifies the script location.
- Provide a default script location in your template and then use a nested template to override that location.
- What is a VHD?
- A virtual hard disk, stored as a virtual file by Azure.
- A volatile hard disk. Its contents are lost unless you back them up.
- A variable hard disk that you can use to start different operating systems in a virtual machine.
- A valuable hard disk. It contains your organization’s critical (valuable) data. Azure ensures that its contents can’t be accidentally overwritten.
- Which tool should you use to prepare a Windows Server image for generalization?
- SysConfig
- WinConfig
- waagent
- Sysprep
- Microsoft Endpoint Configuration Manager
- Which command should you use to prepare a Linux image for generalization?
- sysprep
- waagent
- linuxprep
- systemctl
- syscmd
- What is Azure Automation State Configuration?
- A declarative management platform to configure, deploy, and control systems.
- A service used to write, manage, and compile PowerShell Desired State Configuration (DSC) configurations, import DSC resources, and assign configurations to target nodes.
- A service that manages the state configuration on each destination, or node.
- A PowerShell DSC script ______________.
- Contains the steps required to configure a virtual machine to get it into a specified state.
- Is idempotent.
- Describes the desired state.
- Why should you use pull mode instead of push mode for DSC?
- Pull mode is best for complex environments that need redundancy and scale.
- Pull mode is easy to set up and doesn’t need its own dedicated infrastructure.
- Pull mode uses the local configuration manager (LCM) to make sure that the state on each node matches the state specified by the configuration.
- Which restart policy is typically the best choice for long-running tasks that service requests?
- Always
- Never
- OnFailure
- True or false: by default, the values of an environment variable can be seen in the Azure portal and the Azure CLI output.
- True
- False
- Which troubleshooting command can be used to view container startup events?
- az container logs
- az container attach
- az container exec
- Suppose you work for a company that builds a Massively Multiplayer Online (MMO) game. You decide to move all your services to Azure Kubernetes service. Which of the following components will contribute to your monthly Azure charge?
- The Master node
- Per deployed Pod
- Per node VM
- Suppose you work for an event management company. Your events website needs persisted storage. Which feature of AKS will you use?
- Use Azure Container Registry
- Storage volume support
- Enable the horizontal pod autoscaler
- Suppose you work for a company that monitors weather conditions. Your team of developers needs to do end-to-end testing with other components in your AKS cluster. The team wants to do testing without replicating or mocking up dependencies. Which service should they use?
- Deployment Center
- Draft
- Azure Dev Spaces
FAQ
- Are there any scale limitations for customers that use managed disks?Managed Disks eliminates the limits associated with storage accounts. However, the maximum limit is 50,000 managed disks per region and per disk type for a subscription.
- Can VMs in an availability set consist of a combination of managed and unmanaged disks?No. The VMs in an availability set must use either all managed disks or all unmanaged disks. When you create an availability set, you can choose which type of disks you want to use.
- If I create a 128-GB disk and then increase the size to 130 gibibytes (GiB), will I be charged for the next disk size (256 GiB)?Yes.
- Can I create locally redundant storage, geo-redundant storage, and zone-redundant storage managed disks?Azure Managed Disks currently supports only locally redundant storage managed disks.
- Can I shrink or downsize my managed disks?No. This feature is not supported currently.
- Can I break a lease on my disk?No. This is not supported currently as a lease is present to prevent accidental deletion when the disk is being used.
- Can I change the computer name property when a specialized (not created by using the System Preparation tool or generalized) operating system disk is used to provision a VM?No. You can’t update the computer name property. The new VM inherits it from the parent VM, which was used to create the operating system disk.
- Can I rename a managed or unmanaged disk after it has been created?For managed disks you cannot rename them. However, you may rename an unmanaged disk as long as it is not currently attached to a VHD or VM.
- What disk types support snapshots?Premium SSD, standard SSD, and standard HDD support snapshots. For these three disk types, snapshots are supported for all disk sizes (including disks up to 32 TiB in size). Ultra disks do not support snapshots.
- I configured my disk to 40000 IOPS but I’m only seeing 12800 IOPS, why am I not seeing the performance of the disk? In addition to the disk throttle, there is an IO throttle that gets imposed at the VM level. Ensure that the VM size you are using can support the levels that are configured on your disks.
- Can I use caching levels with an ultra disk? No, ultra disks do not support the different caching methods that are supported on other disk types. Set the disk caching to None.
- Can I attach an ultra disk to my existing VM? Maybe, your VM has to be in a region and availability zone pair that supports Ultra disks.
- Can I use an ultra disk as the OS disk for my VM? No, ultra Disks are only supported as data disks and are only supported as 4K native disks.
- Can I convert an existing disk to an ultra disk? No, but you can migrate the data from an existing disk to an ultra disk. To migrate an existing disk to an ultra Disk, attach both disks to the same VM, and copy the disk’s data from one disk to the other or leverage a 3rd party solution for data migration.
- Can I create snapshots for ultra disks? No, snapshots are not yet available.
- Is Azure Backup available for ultra disks? No, Azure Backup support is not yet available.
- Can I attach an ultra disk to a VM running in an availability set? No, this is not yet supported.
- Can I enable Azure Site Recovery for VMs using ultra disks? No, Azure Site Recovery is not yet supported for ultra disks.
- Is automated migration of an existing virtual machine scale set from unmanaged disks to Managed Disks supported?No. You can create a new scale set with Managed Disks using the image from your old scale set with unmanaged disks.
ANSWER KEYS
- Azure lets you configure your virtual machines to meet your needs. This includes support for using your own VM images.
- Outbound requests are considered low risk, so they are allowed by default. Inbound traffic from within the virtual network is allowed. By placing a VM in a virtual network, the VM owner is implicitly opting-in to communication among the resources in the virtual network.
- Private key access with a passphrase is the most secure option. Even if an attacker acquires your private key, they will be unable to use it without the passphrase.
- The Remote Desktop Protocol (RDP) uses port 3389 by default so this port is the standard port you would open if you wanted to use an RDP client to administer your Windows virtual machines.
- Dedicated data disks are generally considered the best place to store application data files. They can be larger than OS disks and you can optimize them for the cost and performance characteristics appropriate for your data.
- The Azure Cloud Shell is available in the browser and runs with the full Azure CLI. If you prefer Powershell, the Azure Cloud Shell has that as well.
- Adding ‘–no-wait’ will cause ‘azure VM create’ to return immediately without waiting for the VM to actually be created.
- All Azure commands support the ‘–query’ argument which lets you select the useful data in any Azure command response.
- Windows VMs are encrypted using BitLocker.
- You must set the access policy on the Azure Key Vault to allow disk encryption with ADE.
- All disks are encrypted using SSE by default. With SSE, Azure manages the keys and automatically decrypts data for any read operations without impact on performance.
- In the case of Resource Manager templates, Resource Manager takes care of these details for you.
- you can also use the built-in reference function to define dependencies among resources that need to share a property.
- Parameters promote reuse. Their values are filled in when the template runs.
- 1
- 4
- 2
- Azure Automation State Configuration enables you to ensure that all virtual machines in a collection are in the same consistent state.
- A PowerShell DSC script is declarative. It describes the desired state but doesn’t include the steps necessary to achieve that state.
- The local configuration manager (LCM) on each node automatically polls the pull server at regular intervals to get the latest configuration details. In push mode, an administrator manually sends the configurations toward the nodes.
- The restart policy Always will ensure needed processes continue to be available even if a restart is required.
- Environment variable are not secured by default and their values can be seen in the Azure portal and the Azure CLI output.
- The az container attach command shows container events and logs. By contrast, the az container logs only shows the logs and not the startup events.
- You only pay for the virtual machines instances, storage, and networking resources consumed by your Kubernetes cluster.
- AKS supports both static and dynamic storage volumes for containers that need persisted storage.
- Azure Dev Spaces allows for the development of code in isolation, and do end-to-end testing with other components without replicating or mocking up dependencies.

So WHAT IS THE ANSWER TO 24??? Just put A,B,C and stop not answering the question… unbelievable
LikeLike